The goal of this lab was to visualize the difference between good and bad data through image processing. Using images collected with a DJI Phantom 3 from the Litchfield lab, two orthomosaic and digital surface model (DSM) renderings of the images were generated: one of which was geolocated with Geographic Coordinate Points (GCPs) and the other was not.
Methods
Part I: Image Processing with out GCPs
To begin this lab, a folder containing over 200 pictures was brought into a new Pix4D project as a directory. The project was given a name containing the date of collection, the site, and the unmanned aerial vehicle (UAV) used. This way, the project information is in the title to maintain proper file management. This is especially helpful when recalling projects with the same site and/or sensor.
A few parameters were established before initial processing. The Shutter Type was changed to Rolling Shutter and the Coordinate System was changed to Universal Transverse Mercator (UTM); a metric-based coordinate system (the UAV used in this lab is also based in metric units). Then, the 3-D Map template was chosen to generate DSM, Orthomosaic, 3-D Mesh, and Point Cloud renderings of the input images.
 |
| Figure 1: Choosing a processing template. |
Once the template was selected, initial processing could commence. Initial processing generated a rough 3-D point cloud and initial quality report. The quality report flagged many problems with the data.
 |
| Figure 2: Quality check post-processing. |
 |
| Figure 3: Areas of overlapping pictures within the study area. |
 |
| Figure 4: Camera tilt upon image capture. |
As shown in the Quality Check, 26 images weren't calibrated and there were no GCPs to correct the imagery. The Overlap and Camera Movement figures show that the wooded area on the southern side of the mine site caused some issues with the sensor. Notoriously, trees and geographic image processing do not mix well. Due to the nature of branches and trunks of trees, UAV sensors tend to react negatively to those projections which could've caused the odd camera angles and lack of overlap within that area.
Despite numerous flaws with the data after initial processing, the remaining processing was completed.
 |
| Figure 5: Adjusting the DSM method parameter before initiating secondary and tertiary processing. |
For DSM generation, triangulation was used while all other default parameters were untouched. A final point cloud, triangle mesh, DSM, and orthomosaic were generated (see results).
Part II: Image Processing with GCPs
For the second part of this lab, a copy of the first project was used, and this time, GCP locations were imported and used to enhance the spatial accuracy of the resulting models. To do this, a .txt file containing the locations of the 16 GCPs used during this flight was placed in the project via the GCP/MTP Manager.
 | ||
Figure 6: Importing GCP files within the GCP/MTP Manager window.
|

 |
| Figure 8: Ray cloud viewer showing oblique view of image capture and GCP elevations. |
In figure 8, the floating blue joysticks above the floating blue, green, and red spheres represent the GCPs which are positioned at the true elevation of the earths surface. The cameras and point cloud are positioned at incorrect elevations which would affect the areas and volumes of the products. In the next step, the image capture elevations were pulled up to their true positions on earth.
Once the GCPs and their respective coordinates were placed into the GCP manager window, the Basic Editor function was used to locate each GCP in two or more images to facilitate spatial correction of the images.
 |
| Figure 9: The yellow cross represents a user-entered location of the center of the GCP in an image. |
By sifting through the images in the Image Window, the associated GCPs were identified and their centers (the point on the GCP where the associated coordinates are located) were marked. Once all of the GCPs were located in two or more images, the Reoptimize processing tool was used to spatially correct the images.
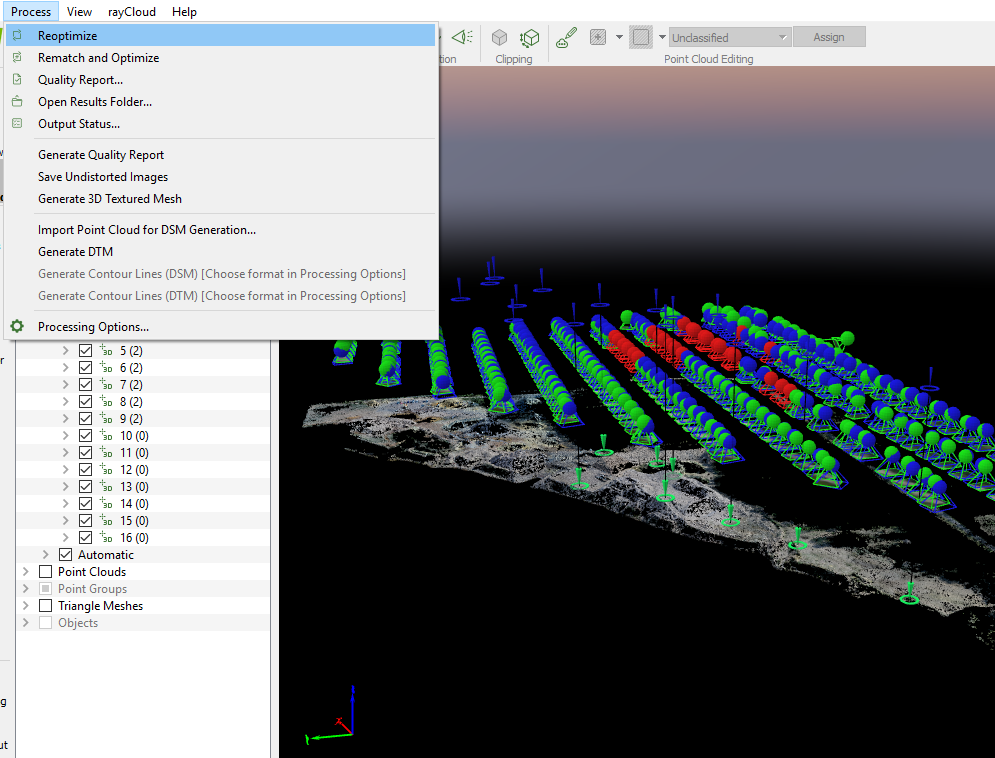 |
| Figure 10: Navigating to the Reoptimize Tool in Pix4D. |
 |
| Figure 11: The blue spheres represent the "pre-spatial correction" elevations of image captures and the green spheres represent the spatially corrected elevations. |
 |
| Figure 12: Ground locations of GCPs after correction. |
Then, secondary and tertiary processing were done once more to produce a spatially accurate point cloud, triangle mesh, DSM, and orthomosaic (see results).
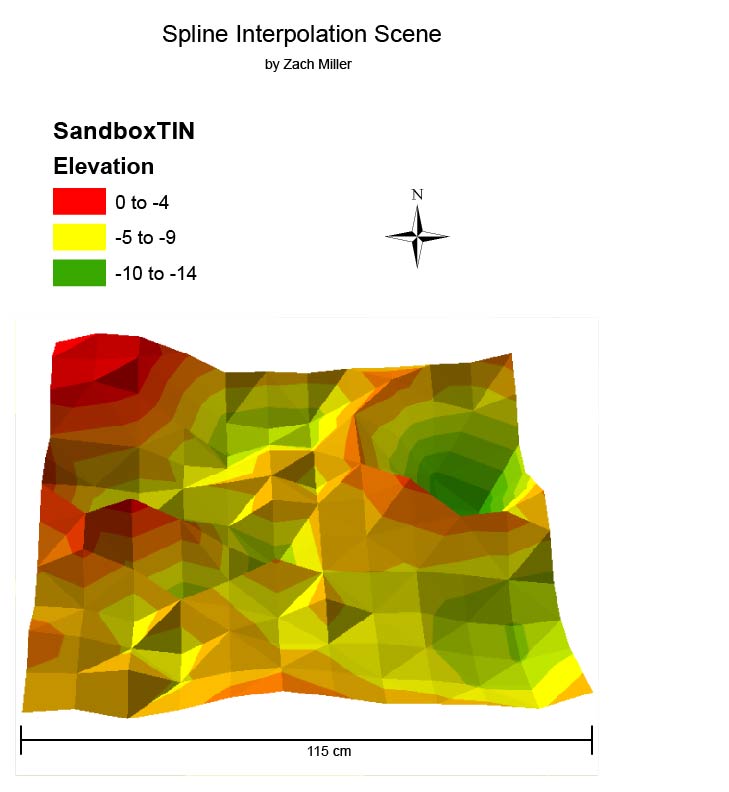
Results
 | ||
Figure 13: Result from Part I DSM.
|

 | ||
Figure 15: Result from Part I orthomosaic.
|

Discussion
After looking at the DSM results, there are some very distinct changes that happen between the one that used GCPs and the one that did not. Feature elevations in the image using GCPs become relatively higher across the study area. The minimum and maximum values associated with either output have changed. This is important due to the fact that the average elevation of Eau Claire is about 274 meters, and before correction, the elevations were significantly lower than on earth. Both images display an erroneous area near the southern portion of the map, however. This area is dominated by tree canopy cover, and the sensor could not properly record the elevations of those features in either image.
The orthomosaics on the other hand, do not contain many noticeable changes of features. There are some small but visible changes in the bottom-left, bottom-right, and top-right corners of the study area, if one looks closely. The image's alignment with the north-south road and east-west road as well as the dirt path in the northern portion of the study area shift and change in shape to reflect those features as they would appear truthfully on the ground. The basemap underneath the orthomosaic helps in visualizing these changes.
Overall, I found this lab to be an insightful examination of how GCPs can be used to more accurately represent products of remotely sensed data. By processing the DSM and orthomosaicked image without GCPs and comparing the results with products that did use GCPs, it showed that GCPs had an effect on the quality and precision of the products. This is an important consideration when determining which software, functions, and products to use for a project where accuracy is vital.
Sources
ArcMap geoprocessing and mapping (2017). Cartography by Zach Miller.
Eau Claire County - Wisconsin County Coordinate System [PDF]. (1995). Wisconsin Coordinate Systems. Average elevation figure.
Peter Menet and Dr. Joe Hupy of Menet Aero (2017). Flight data.
Pix4D image processing (2017). Image processing and geometric correction.